")
Okay, so I decided to give Pugliese bread a shot today. Heard a lot about it, seen pictures of those loaves with the big holes inside, and figured, why not?
Getting Started – The Biga
First thing, yesterday actually, I had to get the starter mix, the biga, going. It wasn’t much, really. Just grabbed some flour, water, and a tiny pinch of yeast. Mixed it up into a kinda stiff blob. Honestly, felt a bit weird leaving just that small amount sitting there. Covered it up and left it on the counter overnight. Patience is key here, I guess.
Mixing the Real Dough
This morning, checked the biga. Smelled kinda nice, yeasty. Time for the main event. I took that biga, tore it into smaller pieces, and dumped it into my big mixing bowl. Added more flour, more water, some salt, and a little bit more yeast. Started mixing it. And wow, this dough was wet. Like, super sticky, gloopy kind of stuff. Forget kneading this thing like regular bread dough, it just stuck to everything. I basically just stirred and folded it in the bowl with a scraper and my hands for a bit until it sort of came together. It looked like a mess, not gonna lie.
Waiting and Folding
So, the next stage was letting it sit. Bulk fermentation, they call it? Anyway, I covered the bowl. But instead of punching it down, the idea is to do folds. Every half hour or so, I’d go back to it. Wet my hands a bit, reach under one side of the dough, stretch it up, and fold it over the top. Did that four times, turning the bowl each time. Did this whole folding routine about three or four times over a couple of hours. You could really feel the dough changing. It started off super slack, but with each set of folds, it got a bit more structure, more bouncy. Still sticky, though!
Trying to Shape This Thing
Alright, after a few hours, it looked bubbly and alive. Time to shape it. This was the tricky part. Dumped the dough out onto a well-floured counter. It spread out quite a bit. Tried to gently fold it into a roundish shape, kinda like folding a letter, then tucking the edges under to create some surface tension. Used plenty of flour on my hands and the scraper, otherwise, it would have been impossible. It wasn’t the prettiest shaping job I’ve ever done, it looked pretty rustic, let’s say. Moved it carefully onto some parchment paper.
Final Rise and Baking Prep
Let it sit again, covered loosely, for its final proof. Maybe an hour or so? While that was happening, I got the oven cranked up super high, like 475 F. Put my cast iron Dutch oven pot inside to heat up too. You want that pot screaming hot.
Into the Oven
Okay, deep breath. Oven’s hot, pot’s hot, dough looks ready. Carefully lifted the parchment paper with the dough and lowered it into the blazing hot Dutch oven. Put the lid on fast. This traps the steam, helps the bread spring up nicely. Baked it like that for about 20 minutes.
Then, took the lid off. The loaf had puffed up quite a bit! Now, baked it for another 20-25 minutes with the lid off to get that nice dark, crusty exterior. The kitchen started smelling amazing right about now.
The Result
Pulled it out of the oven. Looked pretty good! Nice dark crust, felt hard when I tapped it. Placed it on a wire rack to cool. This is the hardest part – you’re supposed to wait until it’s completely cool before cutting into it. Seriously, hours. It’s torture listening to the crust crackle while it cools.
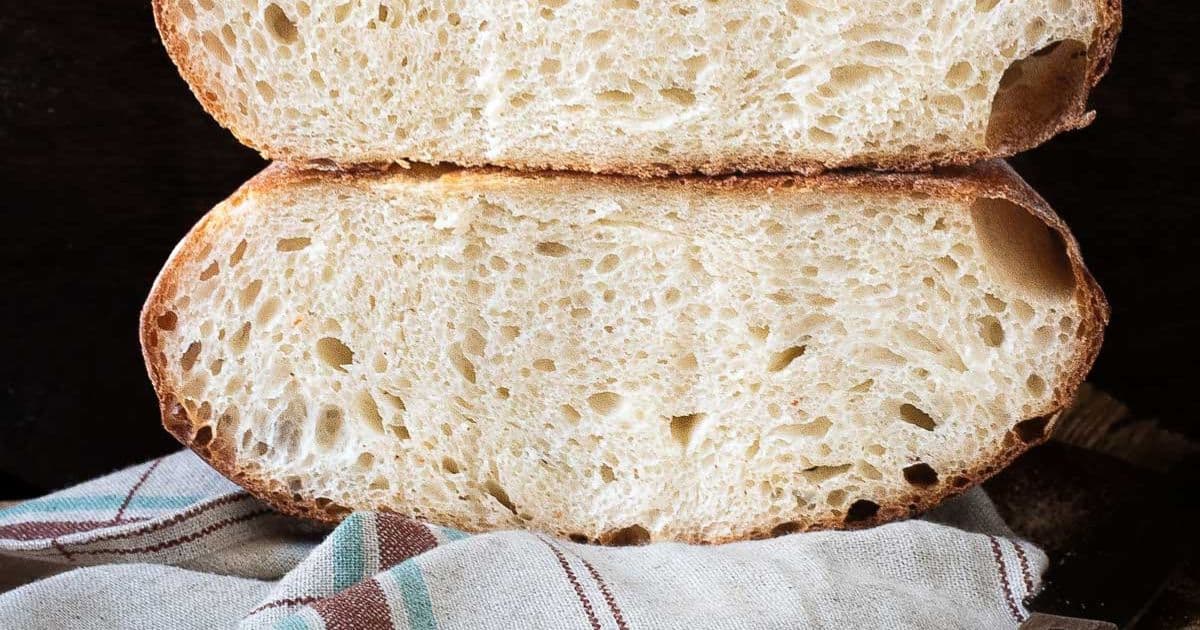
Finally cut into it later. And yeah, it worked! The crust was definitely crusty, shattered a bit when I cut it. The inside? It had those nice, irregular holes I was hoping for. Maybe not as massive as some pictures I’ve seen, but definitely open and airy. The taste was great too, slightly tangy from that long Biga fermentation.
- Mixing was messy.
- Folding felt better than kneading for this wet dough.
- Shaping was a challenge.
- Baking in the Dutch oven really works for the crust.
- Waiting to cut it is pure pain.
Overall, pretty happy with how this Pugliese turned out. Took some time and patience, especially with the sticky dough, but the result was definitely worth the effort. I can see myself making this one again.


")


