
Alright, so I figured it was high time I talked about this little project of mine: hammering out a proper manual photography cheat sheet. I’ve been shooting for ages, mostly on manual, but let’s be honest, sometimes your brain just decides to take a little nap right when you need it most. Or you’re trying something a bit different, and all the numbers start swimming.
Getting Started: Why Bother?
I was getting a bit fed up with those moments where I’d be fiddling, second-guessing myself. You know, the light’s perfect, the moment’s there, and I’m like, “Wait, if I open up the aperture, what do I need to do with the shutter speed again to keep things balanced?” Yeah, silly stuff, but it happens. So, I decided I needed something I could glance at. No shame in it. Better to have a quick reminder than miss the shot, right?
Figuring Out What to Put On It
First thing I did was just grab a notepad. I started jotting down the absolute must-haves. The big three, obviously:
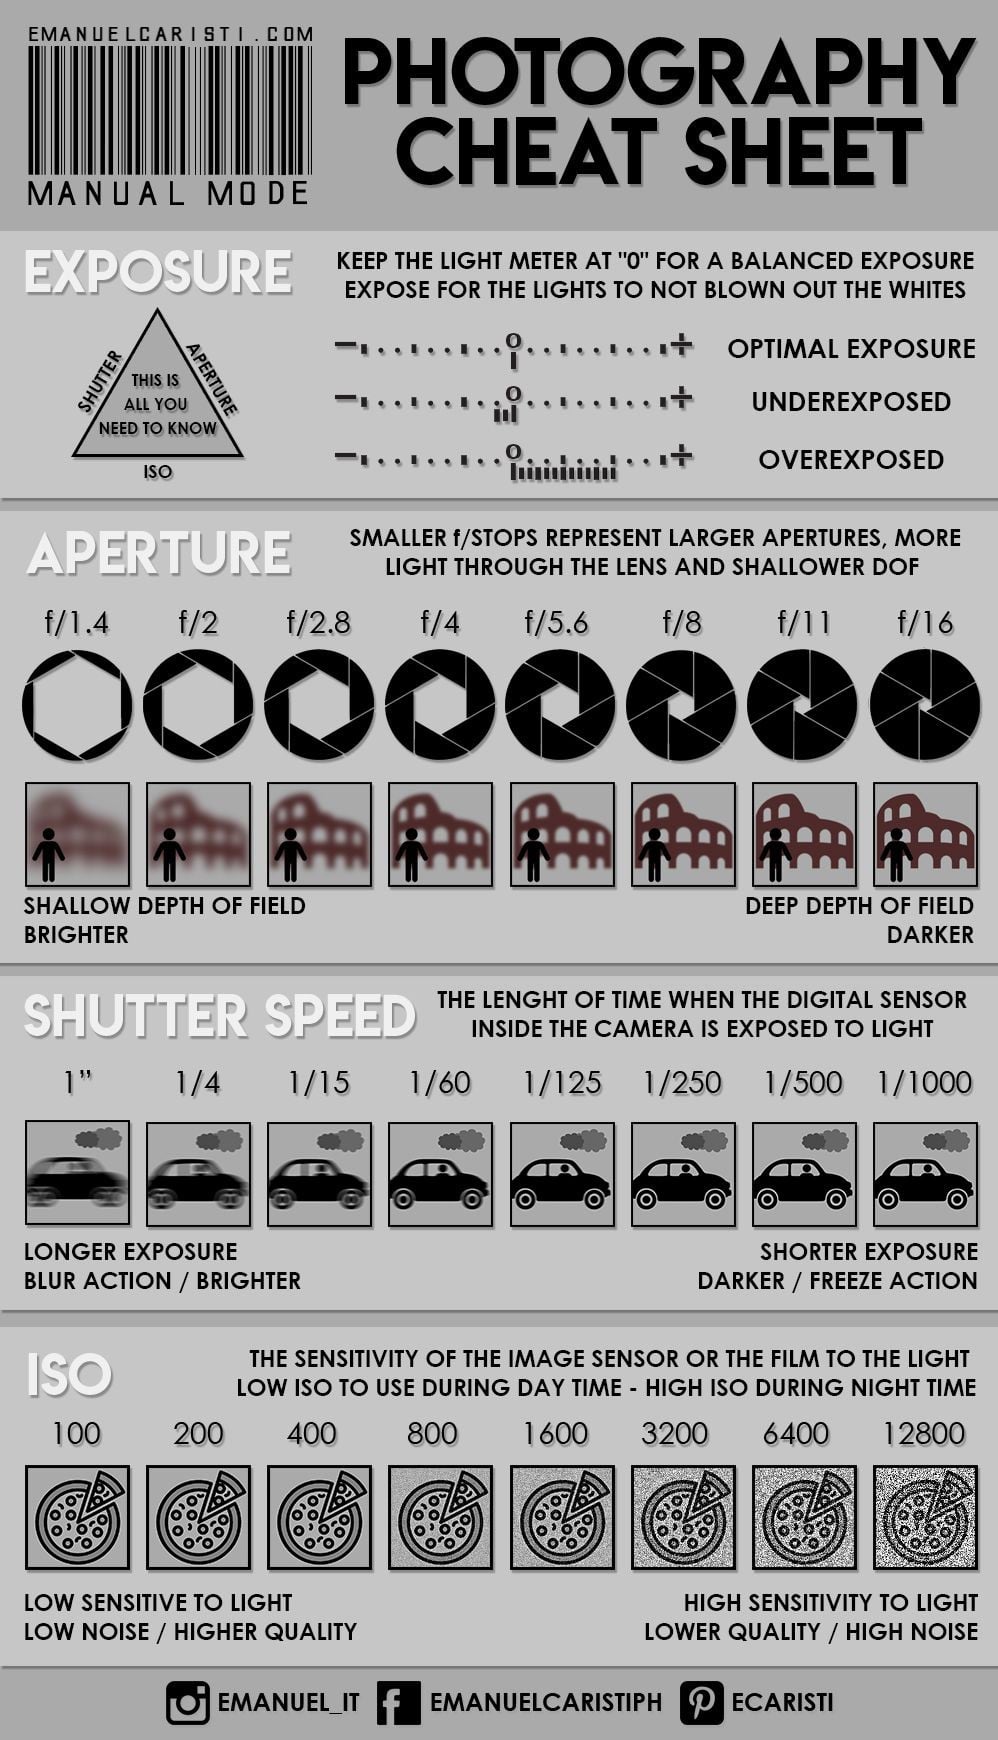
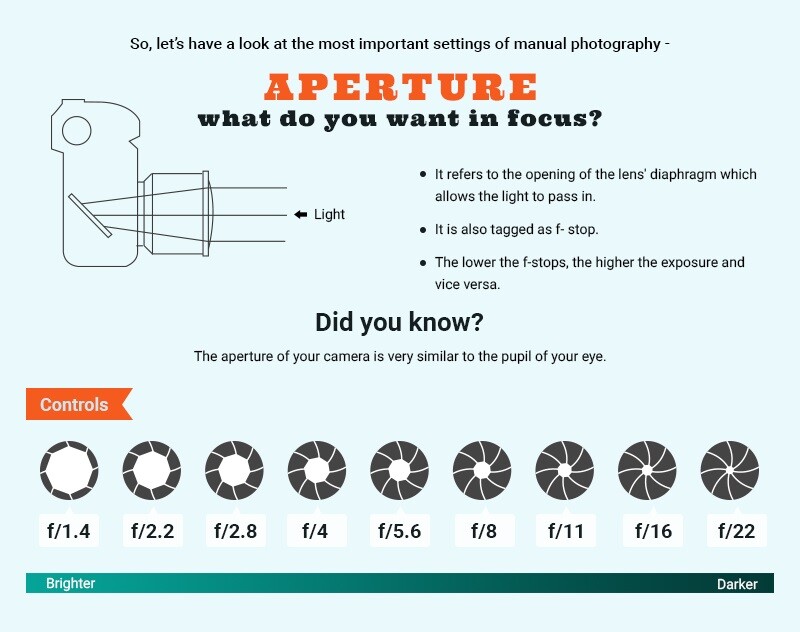
- Aperture: What it does (depth of field, how much light), and the f-stop numbers (lower number = more light, shallower DoF).
- Shutter Speed: How it freezes or blurs motion, and lets light in. Faster speed = less light, sharper action.
- ISO: The sensitivity. Higher ISO = more light, but also more noise. Keep it low if you can.
I also scribbled down a super simple note about the exposure triangle – how these three things are always playing off each other. Change one, and you’ve usually gotta tweak another to keep your exposure right. I wasn’t trying to write a book, just keywords and simple cause-and-effect things.
Putting the Cheat Sheet Together
Initially, it was just my messy handwriting on a piece of paper. I tried that for a bit, carried it in my camera bag. It worked, but it was a bit, well, messy. So, next step, I decided to type it up. Made it cleaner, easier to read at a quick glance. I kept the formatting dead simple. Big headings for Aperture, Shutter Speed, ISO. Bullet points for the key takeaways underneath each. I also made sure to include a tiny section on “common scenarios.” Like, “Portraits: try f/1.8-f/4 for blurry background.” Or “Action: shutter speed 1/500s or faster.” Just basic starting points.
The main thing was to keep it small. I printed it on a piece of card stock, about the size of a postcard. Something I could easily slip into my pocket or the side pouch of my bag. No point having a cheat sheet if it’s a giant poster you can’t carry around.
Testing it Out in the Wild
So, with my newly printed cheat sheet, I went out shooting. Deliberately put myself in a few different situations. Bright daylight, then later as the sun was setting. Tried some street photography, then some still life stuff in the garden. Every time I felt a bit of a mental block, I’d pull it out. Not to tell me exactly what settings to use, because every scene is different, but just to remind me of the relationships. “Ah, right, if I want more depth of field here, I need to close down the aperture, which means I’ll probably need a slower shutter or higher ISO.”
It definitely helped speed things up. Less fumbling, more confidence in making adjustments quickly. I even added a tiny note to myself about white balance basics after one session where my colors were all over the place because I forgot to check it.
The Final Result: My Go-To Helper
So now I’ve got this little card. It’s not magic. It doesn’t take the photos for me. But it’s a solid little helper. It’s like having a tiny, experienced part of my brain written down that I can refer to when the active part is being a bit slow. It’s dog-eared now, got a few coffee stains on it, but it does the job. And honestly, the process of making it, thinking through what was really essential, that was just as helpful as using the sheet itself. It really cemented those core ideas. If you’re finding yourself hesitating with manual mode, I’d say give it a shot. Make your own. It’s a simple thing, but pretty darn useful.
")


")


