
So, I decided I needed to get a grip on this whole manual camera settings thing. You know, moving away from “auto” because everyone says that’s where the magic happens. Easier said than done, let me tell you.
My first few tries? A disaster. I’d be out, see something cool, and then just fumble with the dials. By the time I thought I had it right, the moment was gone. Or the picture was just… bad. Too dark, too bright, blurry when I wanted sharp. Frustrating stuff.
My “Aha!” Moment (Sort Of)
I remember this one specific day. I was trying to photograph my dog running in the park. I wanted that cool shot where he’s sharp and the background is all whooshy. I fiddled and faddled, ended up with a picture of a brown blur. My dog looked more like a speeding potato. That’s when I figured, I can’t keep all this info in my head, not yet anyway. I needed a quick lookup, something I could just glance at.
So, I got home, grabbed a piece of card, nothing fancy, just something that would fit in my camera bag. I decided to make my own little cheat sheet. I wasn’t aiming for a textbook here, just stuff I needed in plain English.
Putting It Together
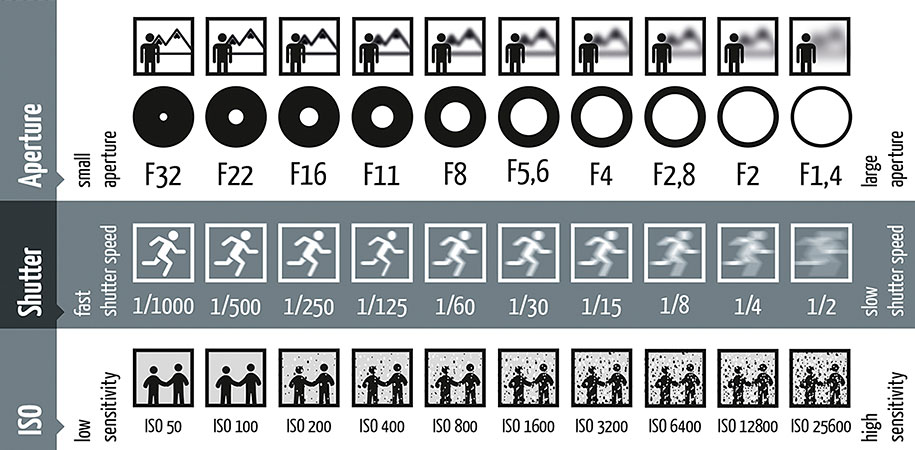
First thing I jotted down was Aperture (that f-stop thingy).</ My brain always got tangled with that. So I wrote:
- Small f-number (like f/1.8): Blurry background, lets in MORE light. Good for portraits or when it’s dark.
- Big f-number (like f/16): More stuff in focus, lets in LESS light. Good for landscapes when it’s bright.
See? Simple. No fancy jargon. Just what it does for me.
Next up was Shutter Speed. This one was a bit more straightforward for me, but I still wanted it down.
- Fast (like 1/500s): Freezes action. Good for sports, kids running, stopping my dog from looking like a potato. Needs more light.
- Slow (like 1/30s or slower): Blurs motion. Good for waterfalls, light trails at night. Careful, might need a tripod or you’ll get camera shake.
Then, the dreaded ISO. I always messed this one up, ended up with super grainy photos.
- Low (like 100 or 200): Best quality, least noise/grain. Use this whenever there’s enough light.
- High (like 800, 1600, or more): Lets you shoot in darker places. BUT, more noise/grain. Only use it if you really have to, to get the shutter speed or aperture you want.
I also added a tiny note at the bottom: “Exposure Meter is your friend! Aim for the middle!” Because, you know, even with the settings, you gotta check if the camera thinks it’s right.
Did It Work?
You bet it did! I laminated that little card with some packing tape – real professional, I know – and stuck it in my camera bag. The next few times I went out, if I felt that familiar panic rising, I’d just pull out my card. Quick glance. “Ah, right, blurry background, need a small f-number.” It took so much pressure off.
It wasn’t about not learning. It was about having a safety net. After a while, I started reaching for the card less and less. The stuff just started to click in my head. I’d find myself thinking, “Okay, it’s a bit dim, I want to freeze the action, so I’ll bump the ISO a bit, open up the aperture, and then see what shutter speed that gives me.”
Now, I barely look at it. But honestly, making that little cheat sheet was probably the best thing I did to actually start understanding manual mode. It wasn’t about some magical formula, it was just about breaking it down into simple, digestible bits for myself. And yeah, my dog photos got a lot better. No more speeding potatoes.
")


")


