
Okay, so I’ve been wanting to try my hand at making some Greek pastries for a while now. I’m no expert baker, but I figured, how hard could it be? Turns out, it’s a bit of a process, but totally worth it. I decided to document my little adventure, mostly so I could remember what I did (and didn’t) do next time!
Getting Started: Choosing the Pastry
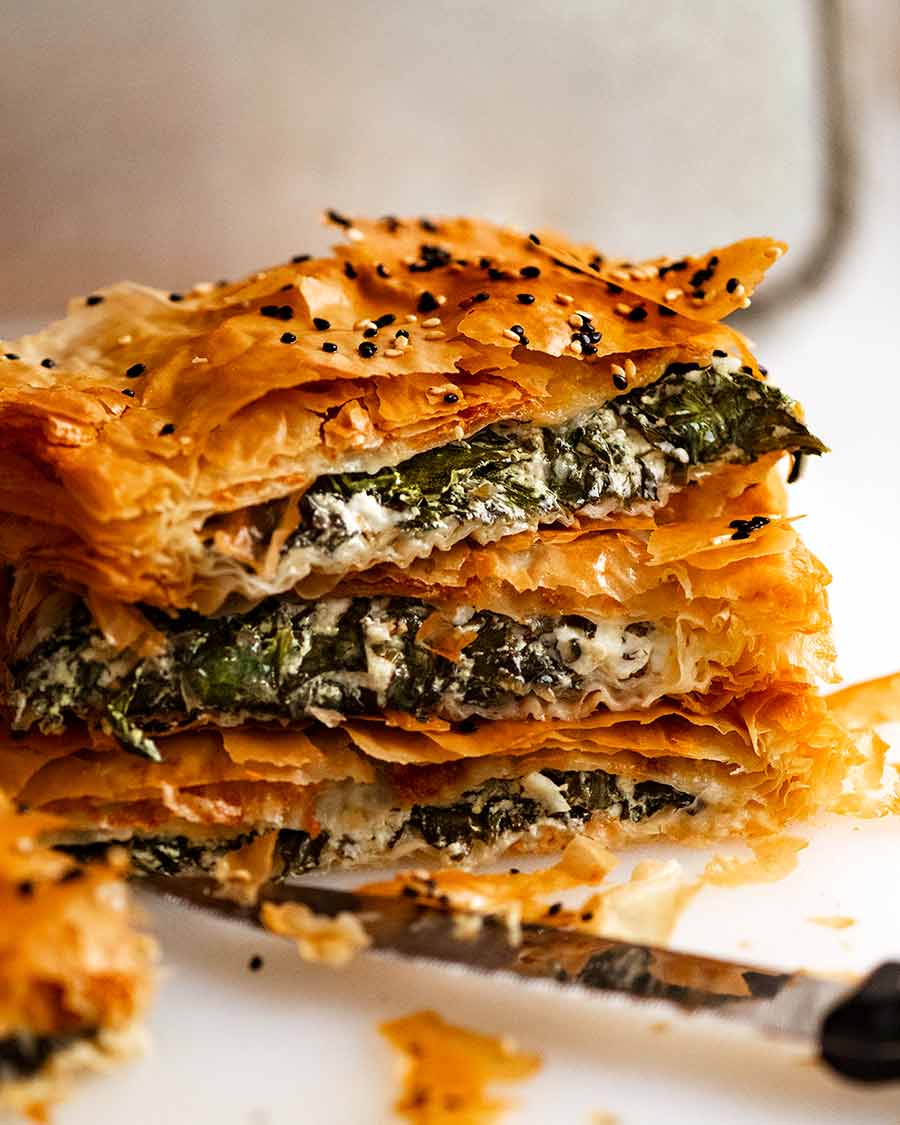
First things first, I had to decide what to make. Greek food has tons of pastries, sweet and savory. I went down a bit of a rabbit hole looking at recipes. Finally, I landed on something that seemed relatively simple: Tiropita. It’s basically a cheese pie, and who doesn’t love cheese?
Gathering the Ingredients (and Improvising)
Next up, the ingredients. The recipe I found called for a bunch of stuff, some of which I already had, some I didn’t. Here’s what I ended up using:
- Phyllo dough: I grabbed a box of this from the freezer section at the grocery store. Seemed easier than making it from scratch, especially for a first attempt.
- Feta cheese: Of course! The heart of the tiropita.
- Other cheeses: The recipe called for ricotta, but I also threw in some mozzarella I had in the fridge.
- Eggs: For binding everything together.
- Butter: Lots and lots of melted butter, for brushing between the phyllo layers.
- Milk or yogurt: I used plain Greek yogurt, because, well, Greek food!
- Salt and pepper: To taste.
The Assembly Process (aka Phyllo Wrangling)
This is where things got interesting. Phyllo dough is thin. Like, ridiculously thin. I learned quickly that you have to work fast and keep it covered with a damp towel, otherwise it dries out and crumbles. I’m not gonna lie, I ripped a few sheets. It’s all part of the learning process, right?
The basic idea is to layer the phyllo sheets in a baking dish, brushing each one with melted butter. I think I used about 6-7 sheets for the bottom layer. Then, I mixed up the cheese filling (feta, other cheeses, eggs, yogurt, salt, and pepper) and spread it over the bottom layer of phyllo.
After that, it was more layering of phyllo and butter on top of the cheese mixture. Another 6-7 sheets, each lovingly brushed with butter. I might have gone a little overboard with the butter, but hey, it’s supposed to be rich!
Baking and (Finally) Eating!
Once the tiropita was all assembled, I popped it into a preheated oven. The recipe said to bake it at 375°F (about 190°C) for 30-40 minutes, or until it was golden brown and crispy. I kept a close eye on it, because I didn’t want to burn all that hard work!
When it was done, I let it cool for a bit before cutting into it. The smell was amazing! And the taste? Even better. The phyllo was flaky and crispy, and the cheese filling was warm and gooey. Success!
So, that’s my first attempt at making Greek pastry. It wasn’t perfect, but it was definitely delicious. I’m already thinking about what to try next. Maybe something with honey and nuts…


")


