
Okay, so today I’m gonna walk you through how I managed to delete pictures off my SD card. It sounds simple, right? But trust me, I fumbled around a bit at first.
First off, I took the SD card outta my camera. Obvious, I know, but gotta start somewhere! Then, I grabbed my little SD card reader. It’s a cheap one I got online, but it does the trick. I plugged it into my computer – you know, the USB port.
Next, I shoved the SD card into the reader. Heard a little click, so I knew it was in there good. My computer made that little ding-dong sound, meaning it recognized the card. So far, so good.
Now, I opened up File Explorer (or Finder if you’re on a Mac). Looked for the SD card – it usually shows up as a removable drive with some goofy name. Found it! Double-clicked to open it and boom, all my photos were right there.
This is where the real work began. I needed to decide which pics to ditch. I started scrolling through, holding down the Ctrl key (or Command key on a Mac) to select all the photos I didn’t want anymore. Took a while ’cause I had a ton of duplicates and blurry shots.
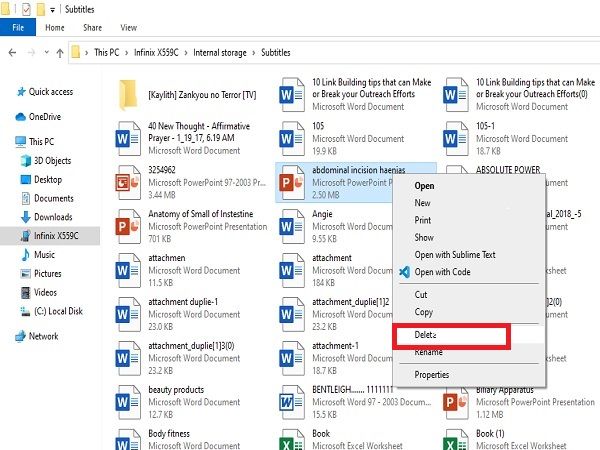
Once I had all the bad ones selected, I hit the Delete key. A little window popped up asking if I was sure. “Yes, I’m sure!” I clicked. Watched ’em disappear. Felt good, like decluttering my digital life, haha!
But wait, there’s more! Just deleting them doesn’t always really delete them. They’re still hanging around in the Recycle Bin (or Trash on a Mac). So, I had to empty that thing too. Right-clicked on the Recycle Bin icon on my desktop and chose “Empty Recycle Bin.” Another confirmation window popped up. “Yep, get rid of ’em for good!”
After that, just to be extra safe, I right-clicked on the SD card in File Explorer and selected “Eject.” Waited for the little notification that it was safe to remove the hardware. Pulled the card reader outta my computer, then took the SD card outta the reader and put it back in my camera.
And that’s it! All those terrible pics were gone. It’s not rocket science, but I always feel a little nervous messing with my photos, so I figured I’d share my process. Hope it helps someone out there!
")


")


