
Alright so this week I got obsessed with figuring out my DSLR. Yeah, that expensive paperweight I bought ages ago? Time to dust it off. Looked at all these buttons and modes and my brain just went numb. Auto mode is fine, I guess, but I wanted cool shots like you see online, y’know? Blurry backgrounds, sharp action shots. Decided to just force myself to try EVERY mode for one whole day.
Starting Simple (Or Not)
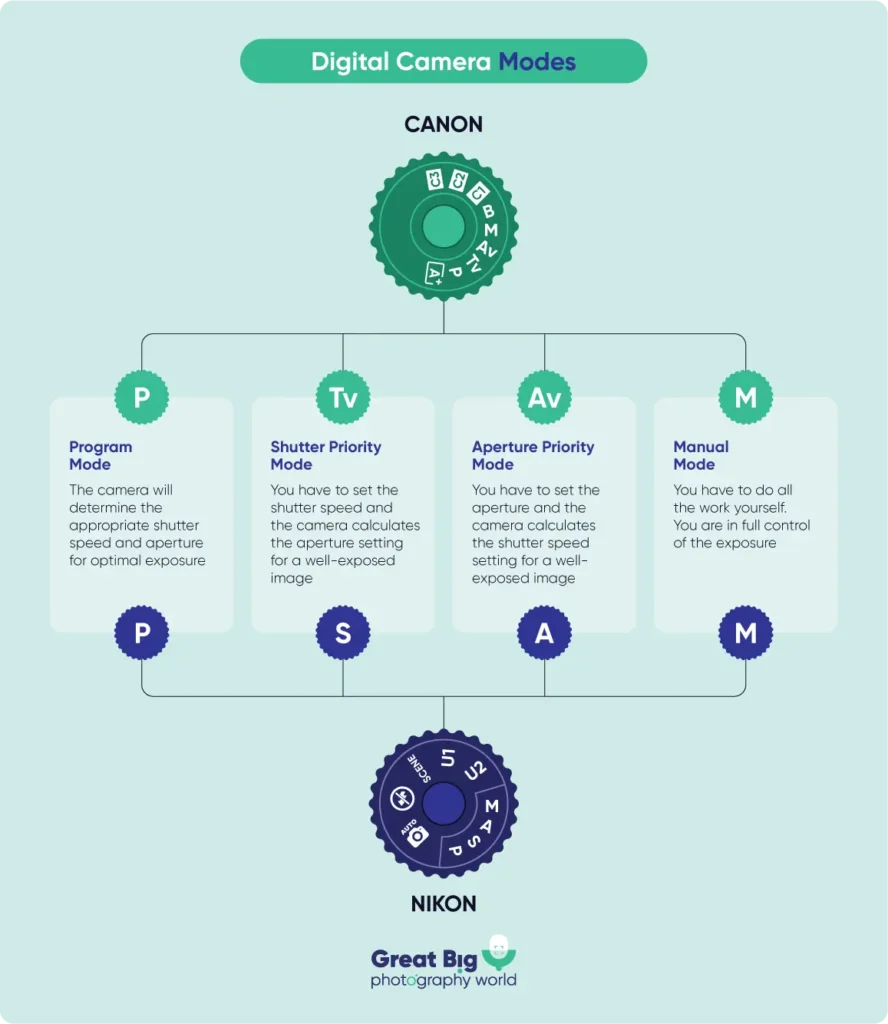
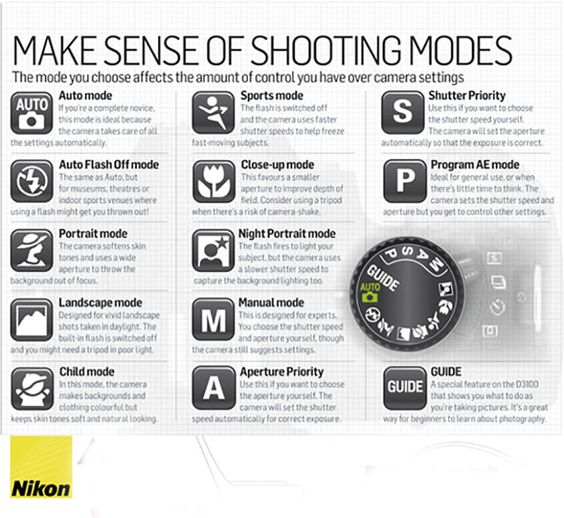
First, just grabbed the camera after breakfast. Pointed it at my stupidly patient cat sleeping in a sunbeam. Flipped the mode dial from the green Auto box. Felt fancy. Landed on ‘P’ – Program mode. Camera manual says it’s like Auto but lets me tweak stuff. Pushed the ISO button. Whacked that number up ’cause the light looked kinda dim inside. Took the shot. Huh. Cat was sharper than usual, but the pic looked kinda…grainy? Like sandpaper. Messed with the ISO down lower. Took another shot. Less grainy, but way darker now. Realized ISO is basically how much light the sensor pretends to see. High number for dark times, low number for bright times. Seems simple until you actually try it.
Getting Braver with Priority
Alright, got bored of ‘P’. Moved the dial to ‘A’ for Aperture Priority. This is all about the light hole size, controls the background blur. Saw a big “f” number on the screen. Small number like f/2.8? Big hole? Big blur? Set it to the smallest number my lens had (f/1.8). Focused on my coffee mug on the kitchen table. Bam! Mug was sharp, everything behind it melted into this nice fuzzy nothing. Loved it! Tried the other end – like f/16. Suddenly everything, the mug, the counter clutter, the wall calendar miles behind, were all fighting to be sharp. Useful maybe for landscapes? Made the mug look kinda lost though.
Later, my kid was skateboarding outside. Dial spun to ‘S’ – Shutter Priority. This controls how fast the shutter snaps. Wanted to freeze him mid-air off a small ramp. Cranked the shutter speed way up, like 1/2000th of a second. Held the shutter button half-way down to focus… clicked! Got him perfectly sharp, mid-jump, wheels stopped cold. Awesome! Then messed up by trying 1/30th second hoping for motion blur on the wheels while he was rolling. Yeah, no. Just got a blurry kid instead of cool blurry wheels. Need way more practice for that effect.
The Weird Scene Modes
Had to try the weird icons too, like the little mountain silhouette and the running dude. The mountain one (Landscape Mode) cranked the aperture way up automatically (big f-number) trying to make everything sharp. Used it on the park view. It was sharp front to back, but the colours looked a bit dull and unnatural to my eye. Then the runner one (Sports Mode). Blasted the shutter speed high and kept raising the ISO like crazy. Snapped pics of people jogging. Got sharp runners mostly, but the photos looked super noisy and kinda harsh under the bright sun. Felt like the camera was overcooking things. Way preferred using A or S myself.
Playing with Effects
Finally, dug into the Picture Effects menu. Some were just awful filters. Tried “Miniature” – supposed to make stuff look like a tiny model. Pointed it down the street. Weird, only a narrow strip was in focus, top and bottom blurry. Didn’t really work for me. The “Selective Colour” one was neat. Camera showed everything in black and white except one colour I chose. Pointed at my red garden gnome surrounded by green plants. Picked red. Boom! Gnome popped bright red against a grey world. Easy dramatic effect. Won’t use it often, but kinda fun.
What Actually Stuck
After messing with everything, here’s what I’ll actually use tomorrow:
- Aperture Priority (A/Av): My new best friend for portraits or anything where I want to twist how blurry the background is. Set that f-number low for blur, high for sharpness everywhere.
- Shutter Priority (S/Tv): Essential for action stuff. Need fast freezing? High shutter speed. Want motion blur? Very slow speed (with a tripod! lesson learned!).
- Playing with ISO Manually: Now I actually get it. Keep it low when possible for clean shots, boost it only when forced, and accept the grain.
Honestly? Still confused by full Manual mode. Too many dials at once. But getting comfy with A and S feels like a huge win. Biggest realization? Auto mode just guesses. Picking the right priority mode actually lets me control the story I want to tell with the photo. Feels powerful. Also realized my phone basically does all this crap automatically now, which is kinda depressing after spending all this time!
")


")


