
Okay, so I recently went through the whole process of getting a visitor visa for the US, and let me tell you, it was a bit of a journey! I figured I’d share my experience here, step-by-step, in case it helps anyone else out there.
Figuring Out Which Visa I Needed
First things first, I had to figure out exactly what kind of visa I needed. Turns out, for just visiting as a tourist, it’s the B-2 visa. There’s a B-1 visa for business stuff, but since I was just planning a vacation, B-2 was the one.
The Dreaded DS-160 Form
Next up was the online application, the infamous DS-160 form. This thing is LONG. I mean, really long. I spent a good few hours filling it out. I gathered all my documents beforehand – passport, travel itinerary, details of previous US trips (if you’ve had any), and even my resume/CV. It asks for EVERYTHING – your entire work history, family details, everywhere you’ve lived, even your social media handles! My advice? Take your time, double-check everything, and save your progress frequently. You don’t want to lose all that work.
Paying the Fee
Once I submitted the DS-160, I had to pay the application *’s non-refundable, so make sure you’re applying for the right visa!
Scheduling the Interview
After paying, I could schedule my interview at the US embassy.I picked a date and time that worked for me, and then I got a confirmation with all the details.
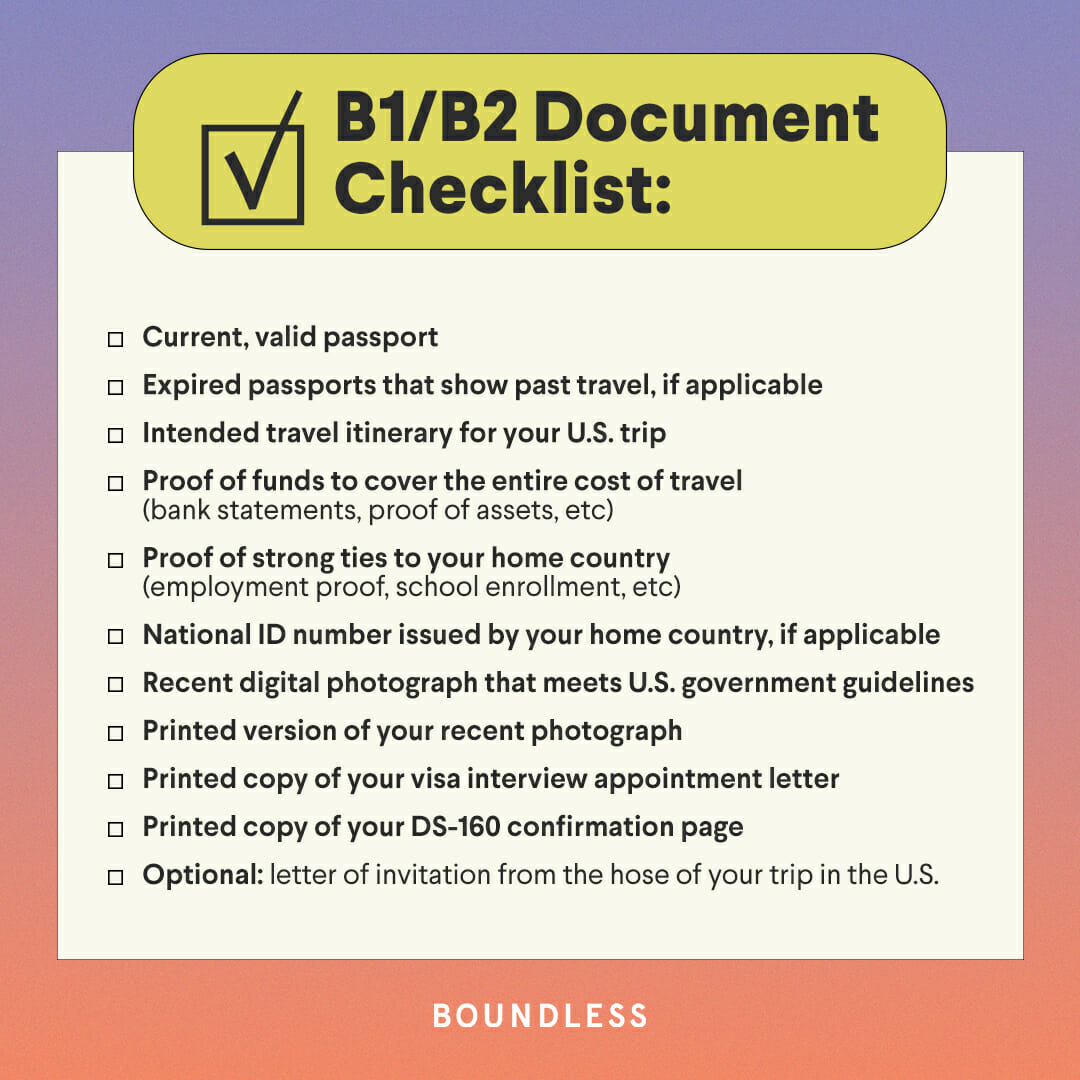
Gathering More Documents
For the interview, I needed to bring a bunch of stuff:
- My interview appointment confirmation.
- My DS-160 confirmation page (you get a barcode after submitting).
- My passport (obviously!).
- A photo that meets their very specific requirements.
- Other stuff is strongly *, Proof that I have ties to my country such as bank statements, a letter from your employer and a House property.
The Interview
The interview itself was pretty quick. I arrived early, went through security, and waited my turn. The consular officer asked me some basic questions about my trip – why I was going, how long I planned to stay, where I’d be staying, and how I was funding it. They also asked about my job and family back home, to make sure I had a reason to return. I just answered honestly and tried to stay calm. I was nervous, but it went fine!
Waiting…
After the interview, I just had to wait. They kept my passport, which made me a little anxious, but that’s normal. A few days later, I got an email saying my visa was approved! Then I choose to get the Passport at home or go to the embassy to pick it up myself.
Getting My Passport Back
Finally, I got my passport back with the visa stamped inside. Woohoo! It was a bit of a process, but totally worth it. Now I can finally go on my trip!
I am so happy to share this experience,I hope that will help you!


")


