Okay, so I recently went through the whole process of getting a US tourist visa from Pakistan, and let me tell you, it was a journey! I figured I’d share my experience to help anyone else going through the same thing. It’s not super complicated, but there are definitely some steps you need to follow carefully.

Figuring Out the Visa Type
First things first, I had to figure out which visa I even needed. Turns out, for tourism, it’s the B-2 visa. Don’t make stuff up, Check it out to make sure you are choosing the right visa type.
Filling Out the DS-160 Form
Next up was the online application form, the DS-160. This thing is LONG. I spent hours, I mean, many hours on it, making sure every detail was accurate. I gathered all my documents beforehand – passport, old visas (if you have any), travel itinerary, employment info. I am just saying, it helped a lot.
- I typed everything carefully, no typos allowed.
- I answered honestly, even the questions that seemed a bit silly.
- I made sure to save my progress often. The website can be a bit glitchy, and I didn’t want to lose all my work.
When I finished, I double-checked and triple-checked everything before submitting. Then I printed out the confirmation page – you’ll need that later.
Paying the Visa Fee
After submitting the form, I had to pay the visa fee. I followed the instructions on the US embassy’s website. There are usually a few payment options, choose one that works for you, and the payment receipt is important.
Scheduling the Interview
With the fee paid, I could finally schedule my interview. I logged in to the visa appointment system and picked a date and time that worked for me. Pro tip: slots can fill up quickly, so don’t wait too long to schedule yours.
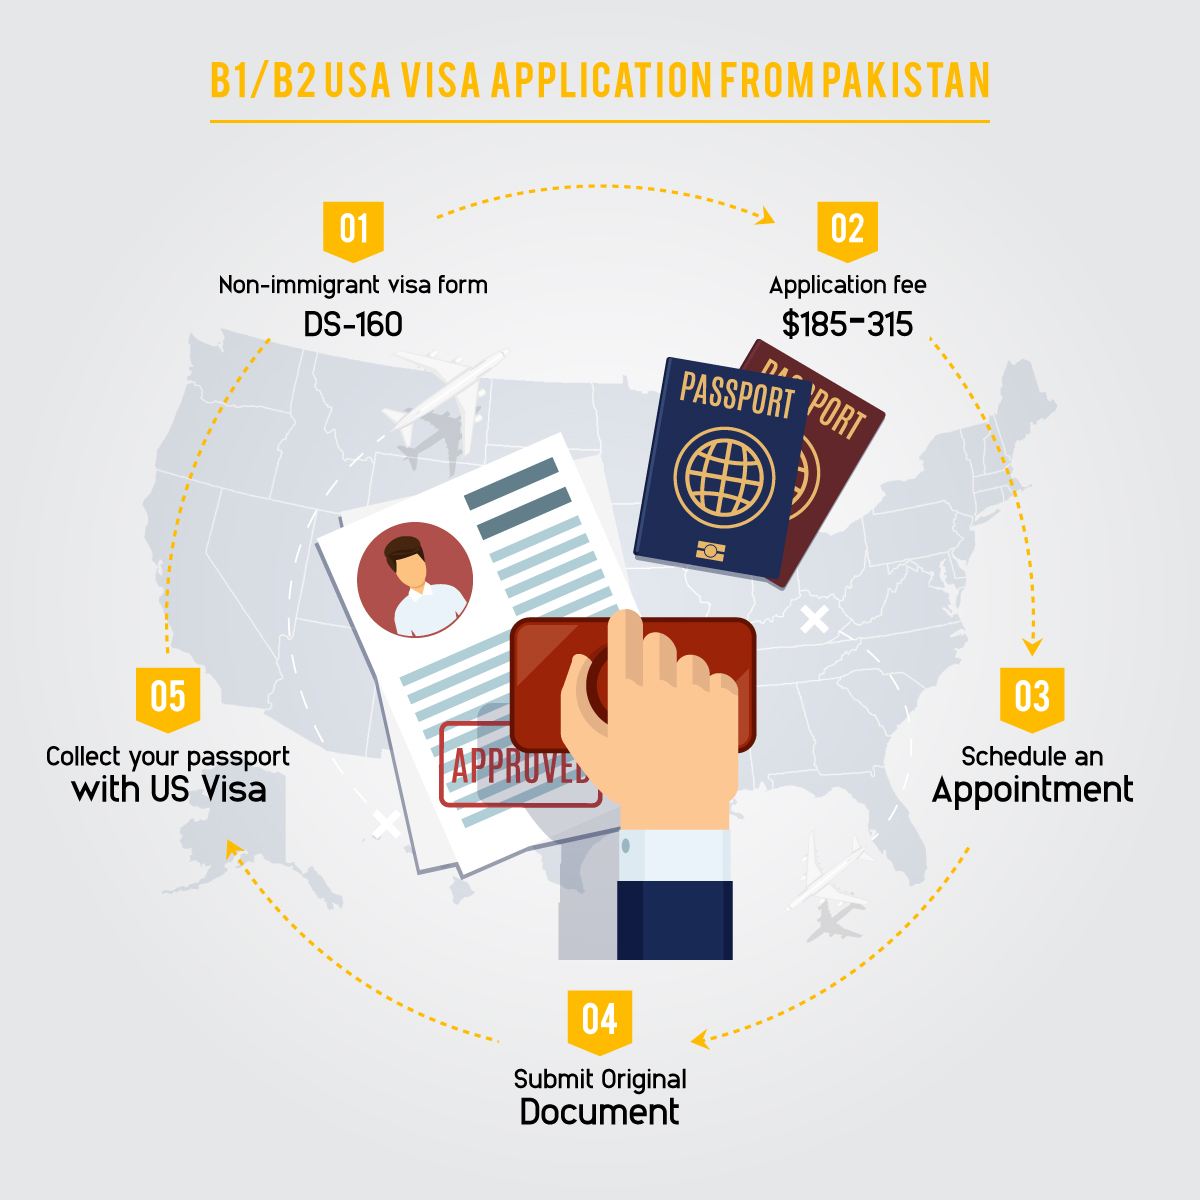
You can select an available date and time for the interview. You can also reschedule the appointment if you got something urgent.
Preparing for the Interview
This was the part I was most nervous about. I gathered all the supporting documents they recommended:
- Passport (obviously!)
- DS-160 confirmation page
- Visa fee payment receipt
- Appointment confirmation
- Photos that meet the visa photo requirements
- Bank statements (to show I could afford the trip)
- Employment letter (to show I had ties to Pakistan and would return)
- Any other documents that I thought might be relevant, like property deeds or family registration certificates.
I also practiced answering common interview questions. I didn’t want to stumble over my words during the actual interview.
The Interview Day
On the day of the interview, I arrived early. I dressed neatly – not too formal, but presentable. I waited my turn, and when my name was called, I approached the visa officer with a polite smile.
The interview itself was pretty short. The officer asked me a few questions about my trip:
- Why I wanted to visit the US
- Where I planned to go
- How long I would stay
- Who I was traveling with
- What I did for work
I answered truthfully and concisely. I provided the documents they asked for, and I tried to stay calm and confident.
Waiting for the Decision
At the end of the interview, the officer told me whether my visa was approved or not. Fortunately, it was approved! They kept my passport to put the visa in it.
If your visa application is approved, you need to pay the visa issuance fee, then you can get your passport with the U.S. visa.
Getting My Passport Back
I waited a few days, and then I received a notification that my passport was ready for pickup. I went to the designated location and collected it. And there it was – my US tourist visa! It took some patience, but I finally made it.

