Okay so last week I tried taking some outdoor portraits for my cousin Sarah. Full sunny day, right? Thought it would be perfect. Boy was I wrong. Her face was completely in shadow under her hat while the rest looked washed out. Total mess. I kept yelling at the camera, “Why you make her face look like a black hole?!”
After that disaster, I figured I needed to learn about controlling light better. Kept seeing stuff about reflectors and fill lights online. Honestly, I thought they were basically the same thing before this. Shows how much I knew! Went down a rabbit hole of cheap lighting gear on some shopping sites.
The Trial Run Disaster
Grabbed a cheap silver reflector off some random place. Felt super flimsy, like holding up a fancy emergency blanket. Set Sarah up on my tiny porch again. Told my kid brother Marco to hold the reflector. Big mistake. He kept wiggling around, more interested in his phone than helping. That silver thing caught the sunlight, sure, but it was bouncing it right into her eyes like a laser beam! She was squinting like crazy. And the light patterns? All weird patches on her face. Looked like she had some kind of skin disease. “Stop blinding me!” she yelled at Marco. Not exactly the serene portrait look I was going for.
Getting Serious (and Spending Cash)
Decided I needed real gear and more control. Bought:
- A bigger gold/silver reversible reflector (looked way sturdier)
- A cheap but powerful small handheld LED fill light
- A simple light stand because bribing Marco with snacks wasn’t cutting it
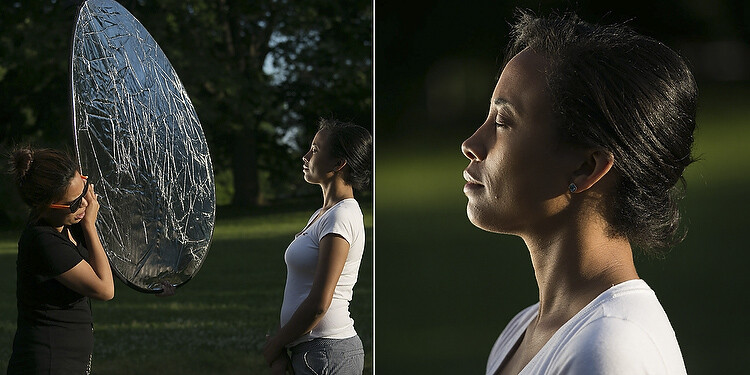
Took Sarah out to a park this time, around 4 PM. Softer light already. Positioned her with the giant oak tree giving shade on one side.
Round 1: Reflector Power
Stuck the silver side of the reflector facing the sun, tilted that light down onto the shady side of her face. Held it myself this time! Didn’t trust anyone else. Had to move it a bit, up and down, side to side. When it hit right? WHOA. Suddenly her whole face was lit evenly, but it still looked natural, like sunlight. No more deep shadows under her eyes or chin. Just filled in the dark bits softly. Way better than my cousin waving a death-ray blanket.
Round 2: Fill Light Experiment
Sun started dipping lower. Tried the reflector again, but it was getting weak. Barely a bounce. Pulled out the little LED light. Set it up on the stand just outside the frame, aiming roughly where the reflector was going. Started on low power. First shot? Totally fake. Looked like I’d smacked an overhead office light on her shoulder. Very harsh. Turned the brightness waaaay down. Like, barely noticeable. Kept adjusting the angle too, trying to mimic the direction of the natural light peeking through the trees. After like five tries? Got it. Just a tiny bit of extra oomph on her cheekbone and neck, cutting the remaining slight shadows. Not shouting “I USED A LIGHT!” at all.
Reflector was great for when I had lots of sun power to bounce. Super simple, made the sunlight do double duty. That little fill light? Perfect rescue squad for when the sun hides or when I’m shooting late.
My big lesson? They both fight shadows, but totally different tools. Reflector is like grabbing free sunshine and moving it. Fill light is dragging a tiny artificial sun into your scene. Both need careful aiming, not just blasting light around. Still figuring out the sweet spots, but damn, finally got pics of Sarah where you can actually see her face! No squinting involved. Next step? Maybe learn what that “diffusion panel” setting is for… looks complicated.
")


")


