
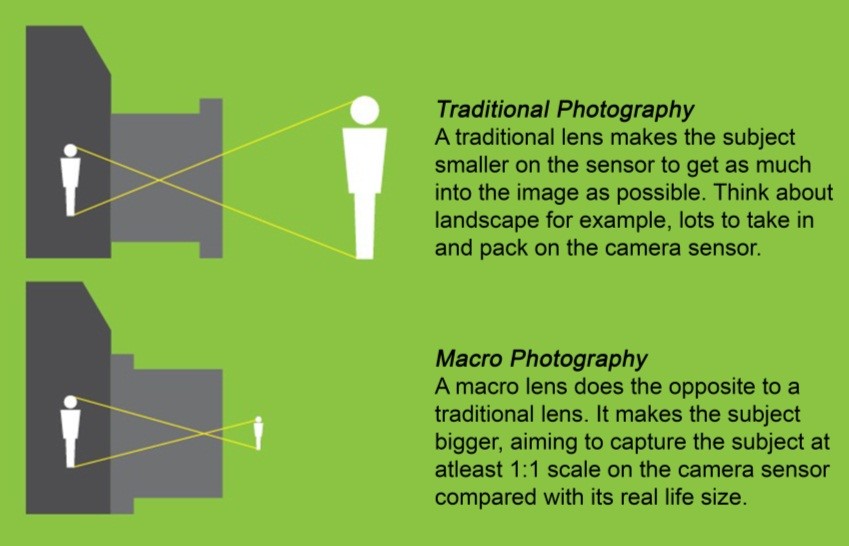
Man, I love looking at those super close-up photos where bugs look like monsters and flowers turn into crazy landscapes. But when I first looked into getting started, the prices scared me off faster than you can say “macro lens.” This week I decided there HAD to be a cheaper way.
First Stupid Step: Almost Buying Wrong Stuff
I almost blew it right from the start. Went online thinking I needed this big, fancy macro lens everyone talks about. Clicked “add to cart” on something way over $500 – that’s like a month of my coffee budget, easy. Panicked halfway through checkout. Felt stupid. Cancelled that nonsense immediately. Figured there must be another path.
The Light Bulb Moment: Cheapo Extensions
Started digging deeper. Found people talking about these little metal rings called extension tubes. Basically empty tubes? Sounds useless, right? But apparently, they push your regular lens further out, making it focus closer. Found a basic manual set on a popular auction site for under $30 bucks for three sizes. Worth a gamble! Screwed them onto my camera one by one with my cheapo 50mm lens already on there. Super easy.
Then I remembered something I already had gathering dust: old screw-on filters. Found my dad’s ancient close-up filter kit hiding in the back of a drawer, probably cost him like $5 decades ago. Jammed one of those magnifying filter things onto the front of my lens too, right behind the tube. The whole setup looked totally janky. Like a Frankenstein monster made of camera parts.
Making It Work Without a Tripod (Yet)
Every guide screams “you NEED a tripod!” Mine’s bulky and annoying. Wanted to stay nimble, see if I could just hold it steady myself.
- Found my light: Started near the kitchen window on a bright morning. Natural light all the way. Way cheaper than fancy flashes.
- Got low & dirty: Got down on my elbows. Set a little house plant leaf on the table. Propped the camera right on a book stack. Table = my tripod, ha!
- Played the focus game: This is where it gets fiddly. With all that magnification, breathing moves the camera way too much. And the focus range? Crazy tiny, like millimeters deep. I moved the WHOLE CAMERA slowly closer and back over the leaf’s surface.
- Made mistakes: Tons of blurry shots. Like, piles of them. But held real still? Held my breath? Snap! Sometimes it worked. Not always. Trial and error, man.
First Look at Cheap Shots
Dragged the files onto my laptop later. Honestly? For almost zero extra cash invested beyond my old camera and lens? I was shocked.
- Crystal Clear Water Drops: On that leaf? You could see the room reflected upside down inside a tiny drop. Wild.
- Hairy Bug Legs: Found a dead fly outside (gross, I know). Its leg looked like a thorny branch under this mess. Details showed up I never imagined.
- Pure Texture: Just zooming way in on a piece of bark or fabric suddenly looked like abstract art.
Yeah, it needs patience. Holding steady is hard. Finding the focus plane takes work. But man, grand total extra spent? $30. Those tubes do 90% of the heavy lifting, honestly. The cheap filter was just extra credit.
So, don’t let the crazy price tags on shiny gear stop you. Grab some dumb metal tubes, use the lens you already own, find some good light, and get messy. Even a klutz like me got results!
")


")


